Too much paper!
My house is full of paperwork. Bank statements, invoices, letters about services. There’s far too much of it, and I’ve never been good at throwing it away in case I need it later on. But physically filing lots of paper requires lots of boxes to be organised, which takes up lots of space and time. Neither of which I have a lot of. So the end result is I have a stack of “loosely-chronologically filed” paperwork on my desk which has been mounting up for a couple of years. And then on the occasion I do need something, I can’t find it, because it’s somewhere in the pile along with everything else. Something needs to change.

Ideally, what I want is a simple system where I only have to touch a piece of paper once, and then it magically ends up in the cloud, sorted into folders based on the type or source, searchable by keywords. Then the physical paper can go straight through the shredder and into the bin. Maybe my house will be a bit tidier as a result!
This is not a simple as it sounds though. Firstly I need a scanner that’s quick and easy to use. I don’t want to have to faff around with software, or manually uploading the results anywhere; the more effort required, the less likely I am to stick to the process. Next up, the result of a scan is usually a JPEG file (or sometimes a PDF) containing just the image. In order to make it really useful, there needs to be some OCR action going on. Then the document needs to be stored somewhere useful so I can manually sort them into different folders (ideally in as simple a way as possible, so bulk drag-n-drop while being able to see an image preview).
I do have an always-on local Linux server, and am happy to run whatever software on there is needed to make this work.
The Scanner
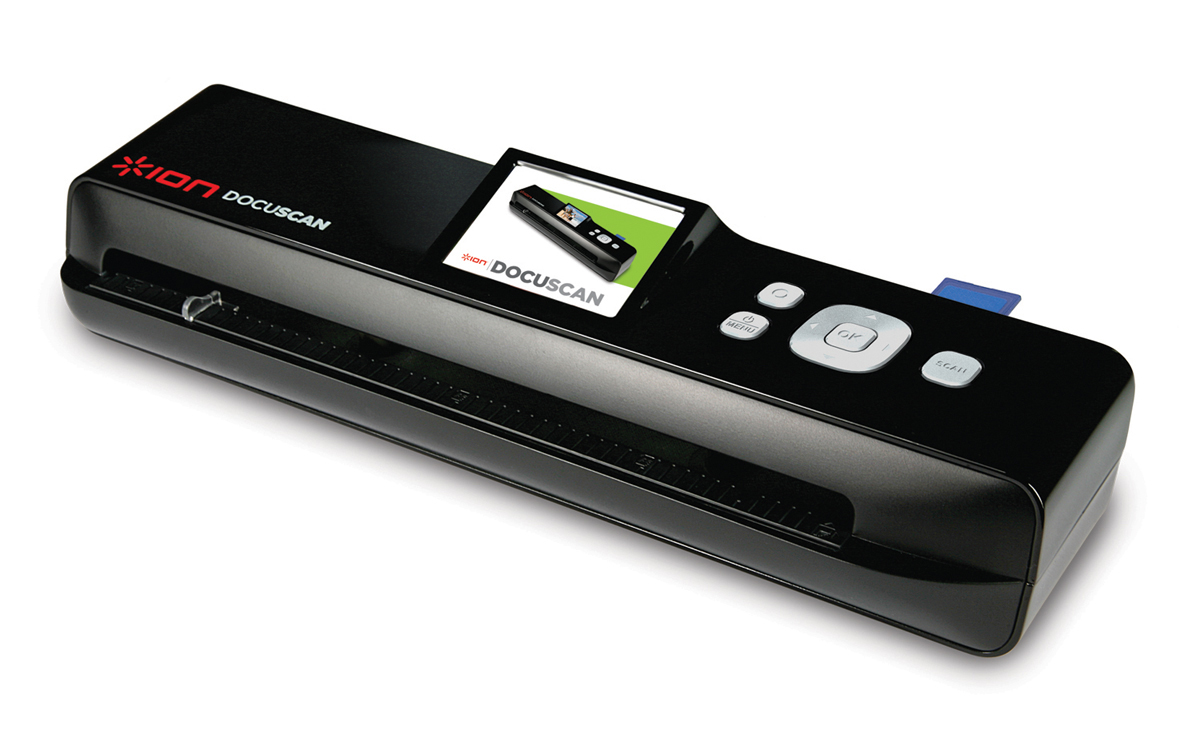
I picked up an ION Docuscan, which is a small, standalone desktop scanner which doesn’t need a PC to operate and writes images directly to an SD card. It’s fairly primitive and doesn’t seem to have much control over the scan type such as DPI or colour depth but it’s simple to use and produces acceptable results. Using it is as simple as feeding the sheet into the front and pressing a button. The motor pulls the paper through and shows the end result on a tiny LCD display. If anything goes wrong, e.g. the drum doesn’t grab the paper, or it moves during the scan I can delete the result using the buttons on the scanner before anything else happens. It doesn’t like anything bigger than A4, but that’s OK for me.
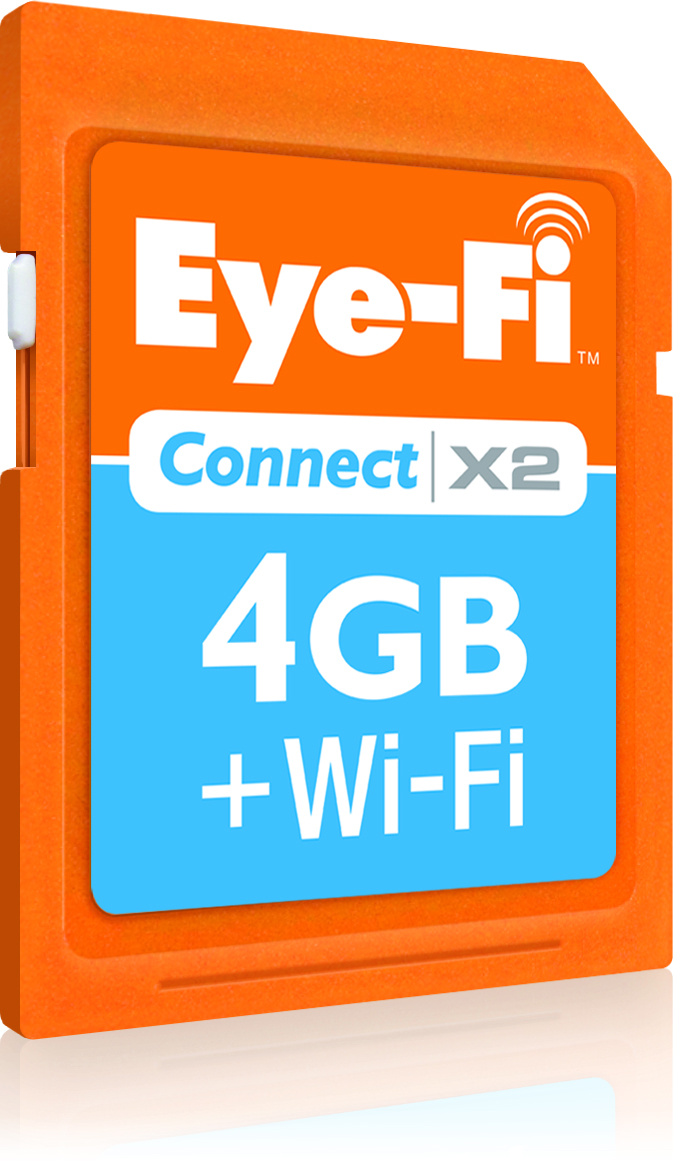
The EyeFi SD Card
It may be a few years old, but I love that this thing exists. It’s a 4GB SD card that contains a small processor with wifi connectivity, and it can be told to upload the files written to it to somewhere else as soon as they are saved. Now we don’t have to spend hundreds or thousands of pounds on a network-attached scanner, or have a giant clunky multifunction printer to get scans stored on the network. Awesome.
The card needs some initial setup, which annoyingly can only be done using Windows or Mac OSX. Ordinarily I don’t run either of these so I needed to setup a Windows VM to get started. I used the IE testing VM provided by Microsoft inside Virtualbox. I passed the SD card through to the windows VM (while my laptop has an SD card slot, virtualbox couldn’t pass that through so I needed to use the USB SD card reader that shipped with the EyeFi card) and installed the software included on the SD card. It needs to be set to upload pictures to “this computer” (which is an oversimplification in the GUI, it just instructs the card to upload it to something on the local network, it doesn’t have to be that particular computer. It seems to do some kind of service discovery or network probe to find the actual machine to upload to).

We also need to grab the UploadKey from a config file that’s written to the Windows machine, which is what’s used for access control later on, so only this card is allowed to upload images. This is saved to C:\Users\IEUser\AppData\Roaming\Eye-Fi\Settings.xml and is fairly obviously near the top of that file.
Software
This is where things get a little interesting, there’s no one-stop fits all solution here, and it took me quite a few hours to get something working. I’m documenting the process for two reasons, firstly it may be useful to someone later on, and secondly that person is likely to be me!
Eyefiserver2
We need to run a copy of eyefiserver2 on the local Linux machine for the card to upload to. This listens on a fixed high-numbered port, and using some kind of service discovery magic, the EyeFi card will find it and send the scanned images to it. The eyefiserver will store the images on a local path and run a script for us after each image is saved.
I installed the copy from silmano’s overlay which works fine but only ships with an openrc initscript. I added the following files for systemd support:
# cat /etc/systemd/system/eyefiserver.service
[Unit]
Description=EyeFi Server

[Service]
Type=simple
User=ben
Group=users
PIDFile=/var/run/eyefiserver/eyefiserver.pid
ExecStart=/usr/bin/eyefiserver --conf=/etc/eyefiserver.conf --log=/var/log/eyefiserver/eyefiserver.log

[Install]
WantedBy=multi-user.target

# cat /etc/tmpfiles.d/eyefiserver.conf
D /var/run/eyefiserver 0755 ben users
D /var/log/eyefiserver 0755 ben users
We also need to configure eyefiserver with our EyeFi card’s upload key, where to save the files, and the script to run:
# cat /etc/eyefiserver.conf
[EyeFiServer]
upload_key=YOUR UPLOAD_KEY_HERE
loglevel=INFO
upload_dir=/media/pictures/eyefi/unprocessed/
use_date_from_file=no
# Commented out for now, we'll come back to this later
#complete_execute=/media/pictures/eyefi/ocr
I’m choosing to save the scanned images to an unprocessed directory and the script will put the post-processed files somewhere more useful later on. At this point we can start the service up:
systemd-tmpfiles --create
systemctl enable --now eyefiserver
systemctl status eyefiserver
And then test it’s working properly by scanning an image and tailing the /var/log/eyefiserver/eyefiserver.log logfile. You should see some messages in the log and a JPG file appear in the unprocessed directory.
Google Drive client setup
Google is my feudal lord and so Drive is my preferred cloud storage provider. There seem to be a great many Linux clients with varying support, however none of them I could find would do what I needed and were packaged up for Sabayon. drive seems to be one of the better clients, and after 30mins trying and failing to write an ebuild for it, I took the lazy route and installed it to /opt
# export GOPATH=/opt/drive
# go get -u github.com/odeke-em/drive/cmd/drive
$ /opt/drive/bin/drive version
drive version: 0.3.4
This needs a directory that will act as a mirror of your Google Drive to work, and needs to be setup with an OAuth token for access. Running the following command will give you a URL to paste into a browser. Accept the authorisation prompt and copy the key back into the drive prompt to get started. All actions then need to be done from within the ~/gdrive directory. So I symlinked the eyefi directory into the gdrive directory and plan to be selective about what I push.
$ /opt/drive/bin/drive init ~/gdrive

$ cd ~/gdrive
$/opt/drive/bin/drive ls
$ ln -s /media/pictures/eyefi ./
The OCR and upload script
So far everything has been about using ready-made products, but this is the bit where we have to get our hands dirty and do some of our own scripting. I’ve put together the following to glue the other components together. It does the following:
- Creates (if not already existing) a temporary working directory and a dated directory to store the processed results in
- Rewrites the JPG image from the unprocessed directory to the output directory to work around the scanner producing malformed JPG files
- Rewrites the EXIF dates to the current date (since the scanner doesn’t have an accurate clock and starts up at 2010-01-01 00:00:00 every time it’s powered on)
- Converts the JPG into a PDF document
- Uses pdfsandwich to do the OCR and produce the final PDF we’re after
- Passing calls to
gsthrough a wrapper script which noops some of the operations, for the reasons described below
- Passing calls to
- Moves the PDF into the right place and cleans up all the temporary files
- Pushes the OCR’d PDF to Google Drive
pdfsandwich post-processes the results by passing it through ghostscript to do things like resize the page back to A4. Due to an incompatibility, this broke the ability to search the document since it was inserting additional whitespace between every character of text (so instead of searching for “hello”, you’d have to search for “h e l l o”, which is no good to me). I found the intermediate files to be perfectly usable so wrote a horrifically quick and dirty wrapper script around ghostscript which noops some of the operations. Unfortunately pdfsandwich doesn’t expose options to disable some of the post-processing, but does let you specify the gs binary, which meant I could point it at a shell script without mucking around with the locations of system binaries or custom PATHs. I hope this will be fixed upstream at some point so I can remove the hack.
The OCR script:
#!/bin/bash

DATE=$(date +"%Y-%m-%d")
EXIFDATE=$(date +"%Y:%m:%d-%H:%M:%S")

IMAGE=${1##*/}
UNPROCESSED_PATH=${1%/*}
IMAGE_PATH=/media/pictures/eyefi/${DATE}

WORK_PATH=/media/pictures/eyefi/.tmp
PDF_PATH="${IMAGE_PATH}/OCR"
PDF=${IMAGE%.*}.pdf
OCR_PDF=${PDF%.pdf}_ocr.pdf

# Create the output dirs if not already
mkdir -p "${PDF_PATH}" "${WORK_PATH}"

# Scanner malforms the JPG files
/usr/bin/mogrify -write "${IMAGE_PATH}/${IMAGE}" -set comment 'Extraneous bytes removed' "${UNPROCESSED_PATH}/${IMAGE}" 2>/dev/null

# Update the exif timestamp to today's date, since the scanner isn't accurate
jhead -ts"${EXIFDATE}" "${IMAGE_PATH}/${IMAGE}"

# Convert to PDF
/usr/bin/convert "${IMAGE_PATH}/${IMAGE}" "${WORK_PATH}/${PDF}"

# OCR it
/usr/bin/pdfsandwich "${WORK_PATH}/${PDF}" -o "${WORK_PATH}/${OCR_PDF}" -rgb -gs /media/pictures/eyefi/fake-gs

# Push the resulting OCR'd document up to Google Drive
mv "${WORK_PATH}/${OCR_PDF}" "${UNSORTED_PATH}/${PDF}"
pushd ~/gdrive
/opt/drive/bin/drive push -no-prompt eyefi/unsorted/${PDF}
popd

# Move the unsorted PDF to the final locla location
mv "${UNSORTED_PATH}/${PDF}" "${PDF_PATH}/${PDF}"

# And tidy up
rm "${UNPROCESSED_PATH}/${IMAGE}" "${WORK_PATH}/${PDF}"
And the ghostview wrapper script (don’t look too closely, it’s nasty but does the job for now):
#!/bin/bash
if [ "$7" == "-dPDFFitPage" ]; then
 echo "Faking call to gs to preserve working search"
 cp -- "${@:(-1):1}" "${@:(-2):1}"
elif [ "${5%=*}" == "-sOutputFile" ]; then
 OUT=${5#-sOutputFile=}
 echo "Faking call to gs to preserve working search, copying $6 to $OUT"
 cp $6 $OUT
else
 exec /usr/bin/gs $*
fi
Dependencies
The script requires the following tools:
- imagemagick (provides the convert and mogrify tool)
- jhead (does the exif maipulation)
- exact-image (provides the hocr2pdf tool)
- pdfsandwhich (produces the OCR’d PDF we want)
Managing the files in Google Drive
Now within about 2 minutes, all the freshly OCR’d documents from the scanner appear in my Drive at eyefi/unsorted, and I can drag and drop them in bulk to the folders on the left.
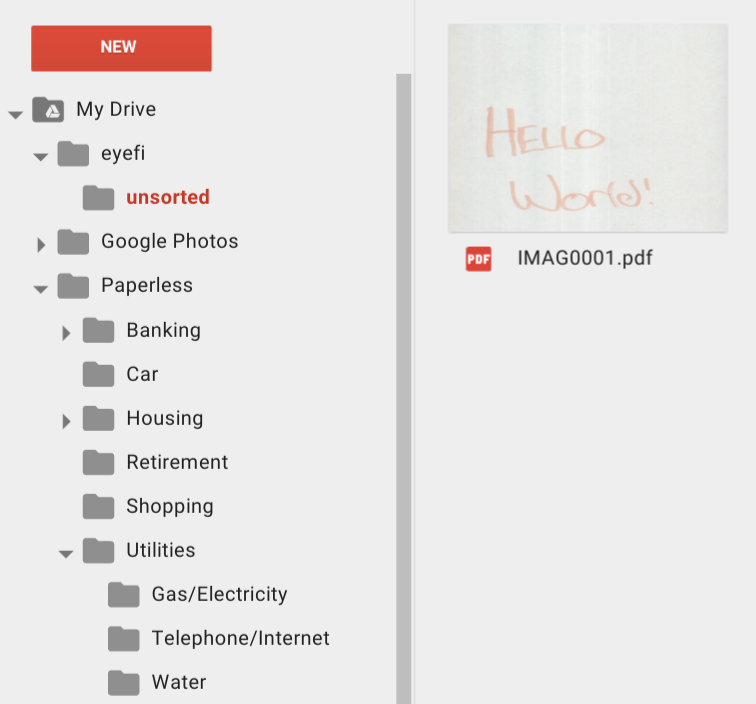
I can also search Drive for any of the text in the PDFs and it will show the search results. The accuracy of the OCR seems to be pretty good here, as the results contain what I expect to see.
Conclusion
My objective has been met; I can run a batch of paper through the scanner every couple of weeks, and quickly file away the resulting electronic documents safe in the knowledge that I could probably find them again. No longer do I need to worry about box files and shelf space. Although I do now have a new problem…

Leave a Reply